Adding a product to WooCommerce is similar to adding a Page or Post to WordPress. All the same functionality and tools will be at your fingertips with a little extra to make product customization easier. First let’s navigate to the “Add New Product” screen. Log into WordPress and on the left-hand menu click Products followed by Add Product. Here you’ll be greeted with a Title Bar at the top, Main Content below the title, Featured Image on the right and Product gallery directly below our Featured Image. If you are unfamiliar with The Title, Content, or Featured Image please read WordPress Editor – Adding Content. The most important portion of this screen will be the Product Data box which is located underneath the main content. There are 6 different product types you can create:

- Simple Product – The most common product type. As the name states it’s very simple with limited but straight forward options. An example product that would fit here could be a bag of chips.
- Virtual Product – This product type can only be accessed online. This could include website membership, PDFs, and more. The customer will only have access to the product after checkout.
- Downloadable – This product type is just as it sounds, downloadable. A product example could be a downloadable song or downloadable software. The customer will download the product after checkout.
- Grouped Product – Used to group multiple related products together. An example product could be a Concert Artist Combo which would include a CD, T-Shirt, and Poster. The user can buy each one individually or visit the Grouped Product to get them all at the same time.
- External / Affiliate Product – Just like an external link, you can add a product that the user will purchase elsewhere.
- Variable Product – Is a bit more complex but also very useful. This allows you to add multiple variations to a single product and then you are able to give each variation its own featured image, price, and SKU. For example, you could have a pair of shoes and you could have multiple colors for this shoe along with multiple sizes. Following this example you can give the red 9in shoes a specific price and featured image so when the user specifies they want red 9in shoes, the website will pull up the associated featured image along with changing the price automatically.
Product Data Tabs and Options
The Product Data box has a few tabs on the left-hand side of the box. These tabs allow you to control both internal and external attributes for your product such as Price, Inventory, Weight and much more. Below we will go through each tab and its options.
General Tab
The General Tab will not appear for Grouped Products. Under this tab you are able to set the following:
- Stock Keeping Unit (SKU) – This is a unique identifier used to keep stock on a product. Most companies have an external and internal stock number that they use.
- Regular Price – The normal price for your product.
- Sales Price – The sales price will overwrite the Regular Price and set a Sale bubble on top of your product on the front end of your website so the user knows that there is a special sale going on.
- Schedule – Set a specific date when this product will go on sale, great for dates such as Black Friday or Cyber Monday.
For Downloadable Products there will be a few extra options which include:
- Downloadable Files – Here you can upload your file for user download.
- Download Limit – Set the number of times the user can re-download this certain file.
- Download Expiry – Set the number of days this download will be available for.
- Download Type – Set the type of download this is. Unless the product is Music or Software you can stick with the Standard Download Type.
For External /Affiliate Products there will be a few extra options which include:
- Product URL – The external web address (URL) for the product.
- Button Text – The text you want the “Buy” button to display on your website.
Inventory Tab
The Inventory Tab will not appear for External/Affiliate Products. Under this tab you are able to set the following:
- Manage Stock – Entirely optional, you have the choice whether or not you will be managing stock for this product.
- Stock Status – Whether or not this product is currently in stock or not.
- Allow Backorders – Set if you are going to allow backorders for a product which will allow your stock to dip below zero.
- Sold Individually – If set this will not allow the customer to order more than one per order. Perfect for customized products.
Shipping Tab
The Shipping Tab will not appear for Virtual Products, Grouped Products, and External/Affiliate Products. Here you are able to set Product Dimensions which is important if you do have UPS / FedEx Shipping Calculator installed. If you are unsure or would like to install the Shipping Calculator, please contact IQComputing. Under this tab you are able to set the following:
- Weight – The weight of your product.
- Dimensions – Length, Width, and Height of your product.
- Shipping Class – Here you can assign a specific Shipping Class to your product. To learn more about Shipping Classes please review WooCommerce Shipping.
Linked Products Tab
The Linked Products Tab will appear on every product type. Under this tab you are able to set the following:
- Up-Sells – You can search your products and add them to the list of “Up-Sells” which will appear on the Product Page labeled as “You may also like…”
- Cross-Sells – You can search products and add them to the list of “Cross-Sells” which will appear on the Cart Page labeled as “You may be interested in…”
Attributes Tab
Attributes are ways you can give your customer more information on the product options without actually splitting them into variations. For example, an attribute could be Vehicle Options and the values could be Rearview Camera, Heated Seats, Heated Mirrors, etc. You can either create custom attributes on the fly or use the WordPress Menu Option on the left-hand side at the bottom under Products. If you have attributes set already, you can select them from the dropdown or by default the Custom Product Attribute is selected, click “Add”. Here we have some options:
- Name – The name of our Attribute. Using the previous above example you could name it “Vehicle Options”.
- Value(s) – The values for our Attribute. If you have multiple values you will need to separate each value with a “pipe” which looks like this: | and is located above the “Enter” key on your keyboard which you need to press “Shift” to use. Using the previous above example some values could be: Rearview Camera|Heated Seats|Heated Mirrors
- Visible On Product Page – Checkbox to let which will tell WooCommerce whether or not to show these attributes on the product page or to only use internally.
- Remove – At the top of the attribute box is a grey “Remove” button which will delete your attribute.
- Save Attributes – At the bottom left there is a grey “Save attributes” button which will save all your current attributes.
Variations Tab
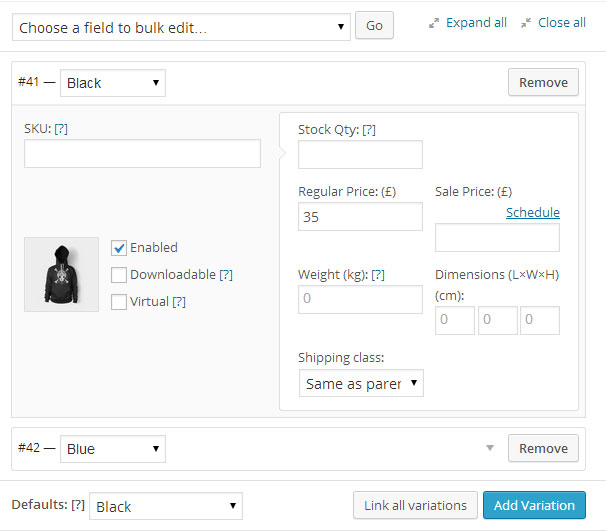
The Variations Tab will only appear for Variable Products. Variations rely entirely on the above Attribute which means you must have valid Attributes set for the product in order to use Variations. At the top you either have an option to Manually Add Variations or Automatically Link Variations. What Link All Variations will do is: if you have multiple attributes WooCommerce will create variations based on the combinations of these attributes. Two attributes with 10 values each using Link all variations will automatically create 100 Variations (10 * 10). If you do not want 100 variations of a product and only 1 or 2 of the product variations cost more (or less) then you will want to add variations manually. Variations more than 100 will slow down your Admin Panel. You will want to keep the variations to a minimum if possible for performance purposes. Once you have some Variations created you’ll be presented with some options:
- SKU – The Stock Keeping Unit is specific to this variation only. Each variation can have its own SKU.
- Enabled – Check to make this variation shows up on the front-end of your website.
- Downloadable – Check if this product variation has downloadable content after purchase.
- Virtual – Check if this is a Virtual Product only.
- Image – Click the square box next to the above 3 checkboxes to upload a Variation Image which will appear in place of the Featured Image if this variations is selected by the customer.
- Stock Qty – The stock of this product variation. If you do not manage stock for this product you may ignore this setting.
- Regular Price – The default price to this variation which cannot be empty (else the variation will now appear).
- Sale Price – If the variation is On Sale this price will overwrite the regular price.
- Schedule – Small link above the Sale Price where you are able to set a date when this variation goes on sale.
- Weight – Here you can set the weight of the product variation.
- Dimensions – You can set the Length, Width, and Height of the product variation respectively.
- Shipping Class – If you have a separate Shipping Class that you would like to apply to this variation you are able to apply it here, otherwise it will default to the overall Shipping Class that you set in the Shipping Tab on this product.
Advanced Tab
Under this tab you are able to set the following:
- Purchase Note – You can send a unique message to the purchaser of this product.
- Menu Order – Custom ordering for products. Setting the order to -1 will keep a product at the top of its respective category list.
- Enable Reviews – By default, we do not enable reviews (as we also do not enable comments for blog posts). If you would like to enable reviews for customers please contact IQComputing.