If you are not sure whether or not the product you have is considered a “Simple Product” please review the Introduction to Product Data and Product Types. To begin, log into your WordPress administration panel. Once logged in, navigate to Products which will be on the left-hand side menu. Next, click the “Add New” button either at the top of this page or on the left-hand menu right underneath “Products”. Now we should be on a page with a title at the top and an editor directly below that. If you are unfamiliar with the native WordPress editing tools, please review the WordPress Editor – Adding Content. The Editor and tools are very similar to Microsoft Word and below we will go through the options on this page.
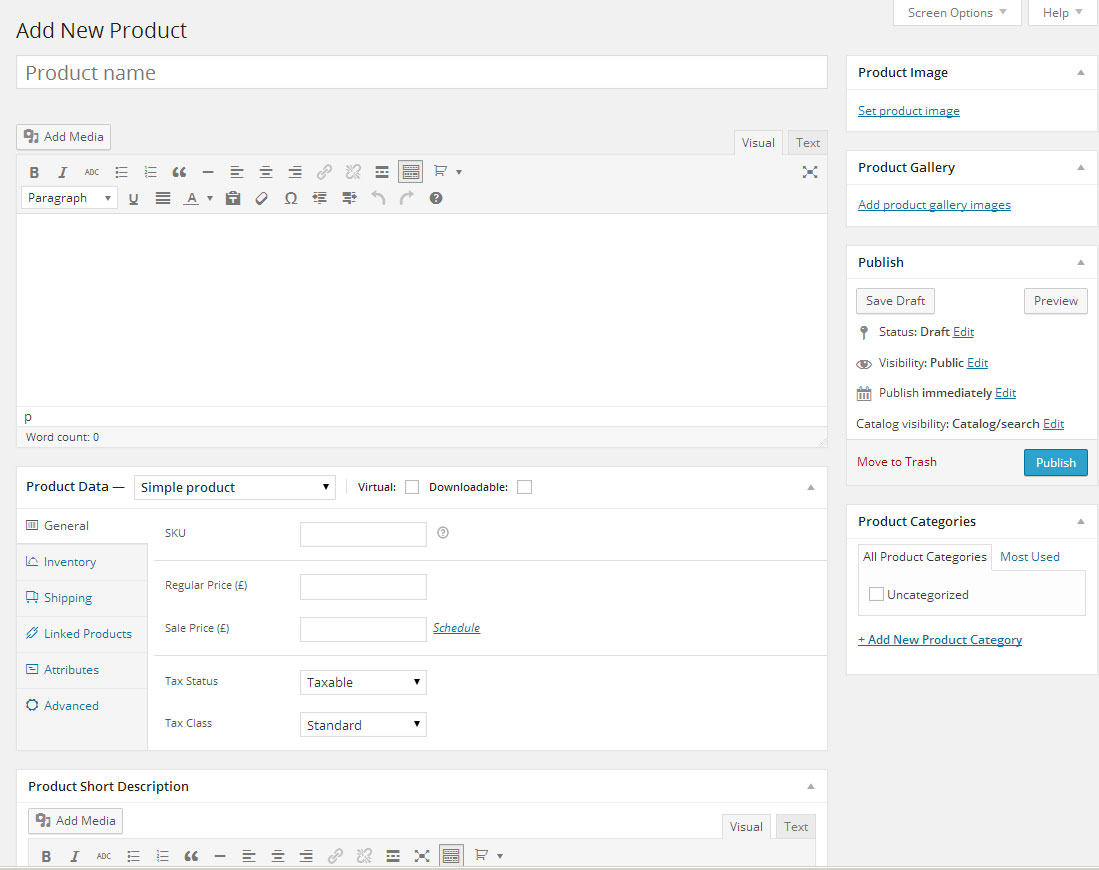
- Title – The very first long box at the top which will hold your products name.
- Editor – Directly underneath the title will be the Editor with many familiar buttons.
- Product Data – Underneath The Editor will be a box that you can enter the specifics of your product which includes: price, SKU, shipping, tax, dimensions, weight, and more.
- Product Short Description – Toward the bottom of the page is a Product Description box which will hold a small excerpt about your products to grab the consumers attention.
- Product Image – A small box on the top right of the page which will hold your products Featured Image which is used on multiple pages of your website to display the product.
- Product Gallery – Below the Product Image is a small box where you can upload multiple images that will be displayed on the product page to showcase your product and its attributes.
- Product Categories – Third box on the right which will hold your “folders” or categories to add your products to so you’re able to keep your e-commerce website organized.
- Publish – The final metabox on the right that you will use to push your Product live to your website.
The Title, Editor, have been covered previously in the WordPress Editor article so we’ll jump right into Product Data.
Simple Product
Below the Editor we’ll see the Product Data box which is where we can add some details to our product. You’ll notice a dropdown and by default Simple Product will be set. Make sure that neither Virtual and Downloadable checkboxes are checked. On the left-hand side of this box are a few tabs. The first tab will be General and below are the options:
General
- SKU – Stock Keeping Unit is so you can reference the product in case you have multiple products of the same name but different attributes.
- Regular Price – The price that you are going to sell your product at.
- Sale Price – If you decide to have a sale for this product you can set a alternative Sales Price that overwrites the Regular Price. There is a schedule link directly underneath where you can set a date for the product to automatically go on sale.
- Tax Status – Whether the product will be taxed or not.
- Tax Class – Is a custom set of tax rules that you can set for your product which can vary from country to country, zip to zip, and more.
Inventory
- Manage Stock – A checkbox that if checked will allow you to manage the inventory of your product.
- Stock Qty – If Manage Stock is enabled this box will appear where you’re able to enter the amount of stock you have of this product.
- Stock Status – Here you can set whether or not the product is currently in stock.
- Allow Backorders – You can also specify if the customer can backorder the product if it is out of stock.
- Sold Individually – If this setting is enabled then the customer can only buy this product once per order, meaning they cannot buy 2 or more all in the same order.
Shipping
- Weight – The weight of your product. Especially important if your website supports UPS or FedEx Shipping Calculator. If you are unsure if this is the case you can contact IQComputing.
- Dimensions – The Length, Width, and Height of your product.
- Shipping Class – A custom set of shipping rules that you can set for your product which are very similar to categories. To learn more please review WooCommerce Shipping
Linked Products
- Up-Sells – Up-Sells are related products that will show up as “You may also like…” when viewing the single product page.
- Cross-Sells – Cross-Sells are related products that will show up as “You may also be interested in…” when viewing the cart page before you check out.
Attributes
Attributes are additional details about your product which can include: features, settings, warnings, or more. To add a custom attributes you can click the blue “Add” button on the right. A box will then pop up with “Name” on the left and “Value(s)” on the right. Name is going to be the name of your attributes (Features, Settings, Warnings, etc.) and the Value(s) will be the actual list of attributes. If we are wanting to display some of the Calculator Settings we could add as attributes: Addition, Subtraction, Multiplication, Division, Graphing, etc. We do need to follow a specific format and separate each value by a “pipe” | which is found above your right Enter key. You need to press “Shift” to get to the pipe. Using the pipe, our values would look like this: Addition|Subtraction|Multiplication|Division|Graphing. Next we need to click the checkbox Visible on the product page so that the consumer can view it on the front-end of your website. Finally, click the Save attributes button on the bottom and you’re done!
Advanced
- Purchase Note – This is a custom message that will be sent to the user once their purchase has been completed.
- Menu Order – A custom menu in Ascending Order (0 – 999) from which your product appears on the front-end.
- Enable Review – Check to enable product reviews. If you are unsure whether or not product reviews are enabled on your website, please contact IQComputing.
Virtual Product
On the General Tab of the Product Data box with Simple Product still selected check the “Virtual” checkbox. This will tell our data that the product you’re selling is a virtual one. On its own this product type isn’t very helpful since whenever the user checks out they get nothing. Usually this type of product is used in tandem with Downloadable or some sort of Membership System where the customer can upgrade their membership status. To learn more regarding Virtual Products, contact IQComputing.
Downloadable
A simple Downloadable Product can be 1 of 2 things:
- Physical Product with a downloadable file upon purchase. This file could be installation instructions, license agreement, coupons, or anything that the user may want to download with the product they just purchased. If this is the case you will need to make sure that Simple Product is selected and only Downloadable is checked.
- Only a Downloadable Product where the user purchases something that they have to download. This could be software, music, podcast, or whatever you can think of. To make a Download Only Product make sure that Simple Product is selected and both Virtual and Downloadable.
Once you are happy with your product settings you can click the blue Publish button on the right side of the page. This will push your product live to your ECommerce Website. If you have any questions at all please contact IQComputing.